Teams Manager Basics: Quick Start for Microsoft Teams Governance
If your company uses Microsoft Teams, you will need to think about Microsoft Teams governance. The potential for uncontrolled growth is high – but with a good governance strategy, you can prevent this from the start and ensure Microsoft 365 security and structure in your Microsoft Teams environment.
With Teams Manager, you can implement important governance measures quickly and efficiently. This guide takes you through the Teams Manager basics and helps you master the basic steps for your Microsoft Teams governance.

Start with Governance in Microsoft Teams with these Teams Manager Basics
Step 1: Setup Teams Manager
The Teams Manager setup forms the basis for your governance. The setup gives you the tools to control the creation, structure and organization of teams right from the start. Once the Teams Manager is configured, you can use all governance functions, from templates to lifecycle management.
Best practices for setup:
- Download Teams Manager from the Microsoft Teams app store.
- Use the onboarding process and mockup data to familiarize yourself with the tool before using it with live data.
- Grant permissions needed to create Teams, add members, channels and apps, and more.
- Optional: Activate guest access
How to set up Teams Manager:
Follow this video tutorial to set up Teams Manager:
Step 2: Create Your Template
Why templates are important:
Templates in Microsoft Teams ensure a uniform structure, improve navigation and reduce the time required for team creation in Microsoft Teams. This allows your teams to work more efficiently straight away.
Best practices for Microsoft Teams templates:
- Define channels, tabs and apps that support your team’s work.
- Remove unnecessary tabs such as Wiki and configure useful tabs such as OneNote or Planner.
- Define the permissions of members and guests in the settings.
- Check and update templates regularly if the team’s requirements change.
How to create templates successfully:
Our video tutorial guides you through setting up a standardized team template:
Step 3: Activate Approval Processes
Why approval processes are important:
Approval workflows function like a checkpoint before a new team is created. They prevent unnecessary or duplicate teams that could lead to uncontrolled growth in your Teams environment. By reviewing requests, you maintain control over the teams that are created and ensure that they meet your organization’s standards.
Best practices for approval processes:
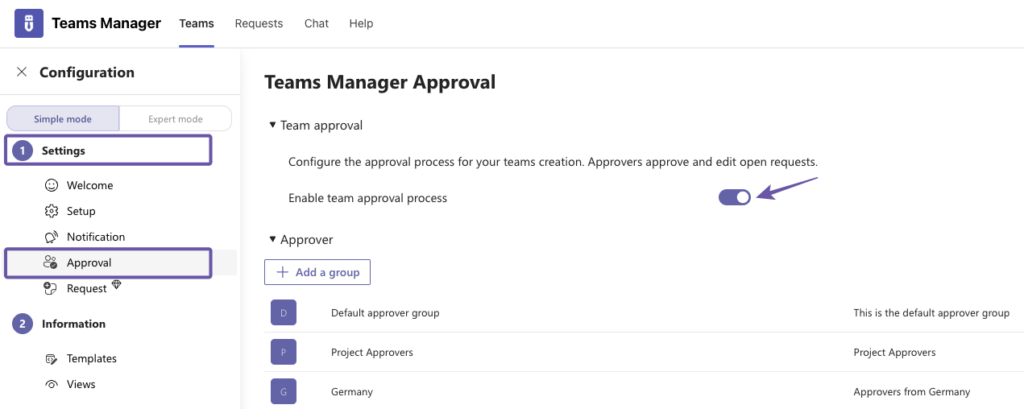
- Set up approval workflows so approvers can review and approve requests.
- Inform your users about the approval process and explain how they can request a team in Microsoft Teams and what the usual processing time is.
How to activate and use approval processes in Teams:
Activate the approval process in the Teams Manager under Settings > Approval.

Watch our video tutorial and learn how to request and approve new teams:
Step 4: Create Approver Groups
Why approver groups are important:
Approver groups allow selected users to monitor the creation and management of teams in their department and ensure order across departments. This segmentation ensures that each new team complies with departmental policies and requirements.
Best practices for approver groups:
- Group approvers by department or project type.
- Assign multiple approvers to distribute responsibilities and avoid bottlenecks.
- Keep track of the approver groups you create and adjust assignments as roles or responsibilities change in the organization.
How to create approval groups in Teams Manager:
Watch our video tutorial to find out how to create, edit and delete approval groups:
Step 5: Define and Implement a Lifecycle
Why lifecycles are important:
By managing your teams with lifecycles, you ensure that only active, relevant teams are used. This prevents uncontrolled growth and security risks due to outdated or unused teams.
Best practices for lifecycles in teams:
- Define conditions for archiving or deleting inactive teams, e.g. on project completion or inactivity over a certain period of time.
- Send notifications to team owners to remind them of the upcoming archiving/deletion.
- Automate lifecycle processes to minimize manual effort and ensure consistent policy application.
How to create and configure a lifecycle:
Our video tutorial shows how to set conditions for archiving and deleting teams:
Step 6: Define a Naming Convention
Why naming conventions are important:
Naming conventions make Teams easier to find and identify. A clear, systematic naming convention helps employees understand the purpose of a team at a glance and improves the overall usability of the Teams platform. Naming conventions therefore support a well-organized Teams environment.
Best Practices for naming conventions in Teams:
- Decide on a format that reflects department, function or project type to allow for quick identification.
- Use prefixes or suffixes for unique labels and avoid special characters that could confuse.
- Review naming conventions regularly to ensure they continue to meet the needs of the organization.
How to create naming conventions with Teams Manager:
Watch our video tutorial on how to create naming conventions in Teams Manager:
Step 7: Develop and Apply Policies
Why governance policies are important:
By defining policies, you establish consistent practices for all teams and ensure that each team setup complies with your organization’s rules. Governance policies can include naming conventions and lifecycles, for example.
Best practices for governance policies in Microsoft Teams:
- Combine lifecycle and naming conventions in your governance policy.
- Set conditions for automatic execution of the policy package based on metadata, team names or templates.
- Review and update policies as changes occur in the organization.
How to create governance policies:
In our video tutorial, we show you how to create and apply policies with Teams Manager:
Step 8: Utilize Templates in Team Creation
Why templates are important when creating teams:
Using Microsoft Teams team templates during team creation ensures that each new team is in line with the existing governance framework.
Best practices for templates in team creation:
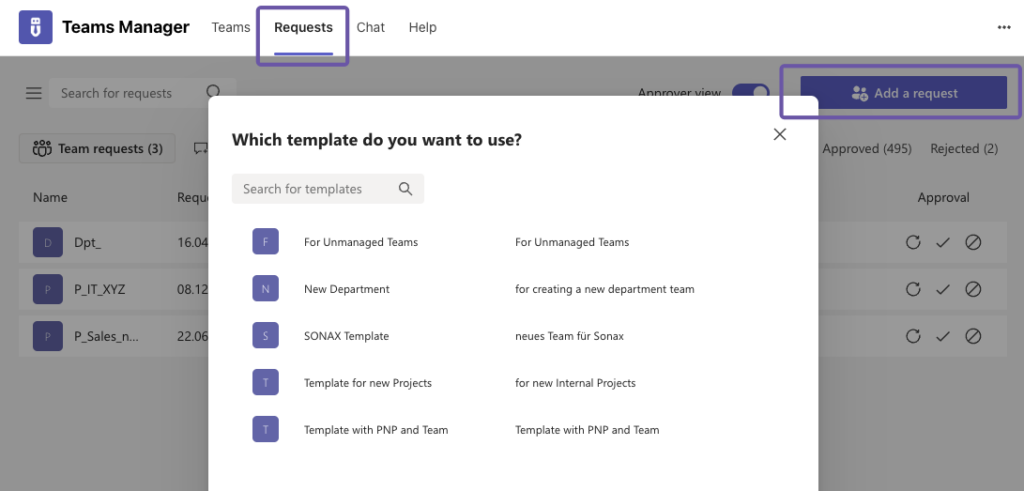
- Utilize predefined templates especially via the request tab.
- Check your templates for the best practices listed in step 2.
How to use templates when creating teams:
If you have created a template as described in step 2, you can now select it when creating teams.
To do this, go to Request and then Add a Request. Click on Team, choose Private or Public, and then select the desired template.

Teams Manager Basics for Managing Guest Access in Teams
In Teams Manager, Microsoft Teams guest access can be allowed or denied according to your organization’s requirements. For comprehensive management of guest users, including lifecycles, approval process and access management, we recommend the External User Manager for complete control of external users and more Microsoft 365 security.
Learn more about how to enable or disable guest access in Teams Manager in our video tutorial:
More Possibilities for your Teams Governance with Teams Manager
By implementing the steps above, you have created a solid foundation for efficient and organized governance in Microsoft Teams. If you’re ready to see how Teams Manager can further improve your governance in Teams, book a demo. We’ll show you more features and how they fit your organization’s needs.
Better Microsoft Teams Governance with Teams Manager:

Head of Marketing & Sales at Solutions2Share – Florian Pflanz has 6 years of M365 experience and has been involved in numerous projects concerning Microsoft Teams governance. In over 200 workshops, he has collected extensive knowledge and best practices regarding Microsoft Teams and companies’ management requirements.


