Microsoft Teams Security Part 1 – Collaboration Aspects
Imagining a modern workplace without Microsoft Teams or one of its alternatives is simply not possible any more. MS Teams has become an integral part of modern work for collaboration and communicating with your colleagues.
However, one aspect that is often neglected is the security of Microsoft Teams. Sometimes it gets complicated to stay up to date with newly introduced configurations and changes.
We will try to cover every detail related to Microsoft Teams security so that you won’t have to face any issues. In our three-part blog series, we will discuss several collaboration and compliance settings, safety, and security settings in Microsoft Teams.
In this first part of our blog series, we will dive into Microsoft Teams Security details related to collaboration aspects. Part 2 takes a deeper look at configuring compliance settings for Microsoft Teams, while part 3 covers the specific settings for security in Microsoft Teams.
So, without further delay, let’s get started with our first section:
Collaboration aspects of Microsoft Teams Security
Please note that while all these collaboration settings make your MS Teams environment safer, they may impede the collaboration between users.
1. Teams Meeting settings: Permissions and Policies
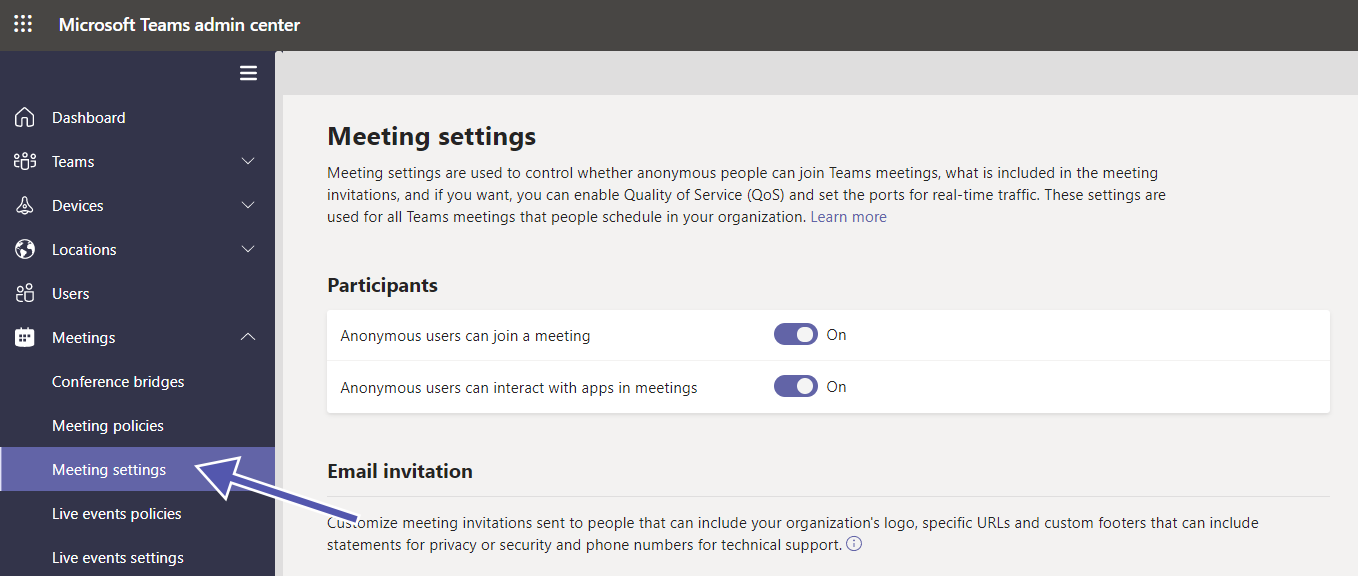
In the Teams Admin Center (https://admin.teams.microsoft.com) you can change meeting seetings for individual participants’ permissions. These can be applied either as an organization-wide default or for specific meetings. This is especially relevant for “meet now” meetings: Change the settings on
- getting notifications for participants who join or leave the meeting
- participants who can skip the waiting area
- presenter permissions in the meeting
- muting attendees (and not enabling them to unmute themselves)
There are numerous options to adapt your organization-wide meeting settings and meeting policies which would go beyond the scope of one single (or three) blog articles. For more information, check out these very detailed articles by Microsoft here, here and here.
2. Teams Channel Moderation
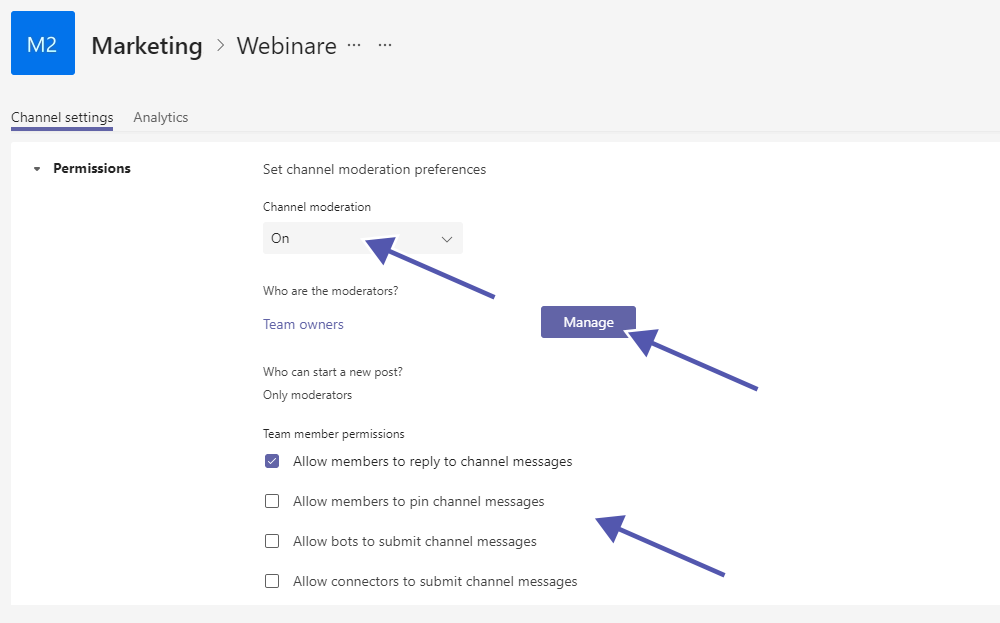
With activated channel moderation, team owners have control over who can perform specific tasks in specific channels. You can find these settings by clicking on the three dots next to the channel’s name and selecting “Manage channel”.
For example, the “General” channel can be used only for announcements this way, which may be especially helpful in project teams with external guest users. Another way to use channel moderation is to allow only discussions on a specific topic: The team owner can start a post, and the team members can answer and discuss it in the answers.
If you activate the channel moderation in Microsoft Teams, a moderator can perform the following tasks.
- Only the moderator can start new posts on the channel.
- The moderator can add or remove other team members as moderators. The team owner, however, is always set as moderator and can’t be removed.
- The moderator can decide whether team members are allowed to pin channel messages.
- The moderator can decide whether to allow team members to reply to channel messages.
- The moderator can decide whether connectors and/or bots can submit channel messages.
3. Microsoft Teams Apps Permissions
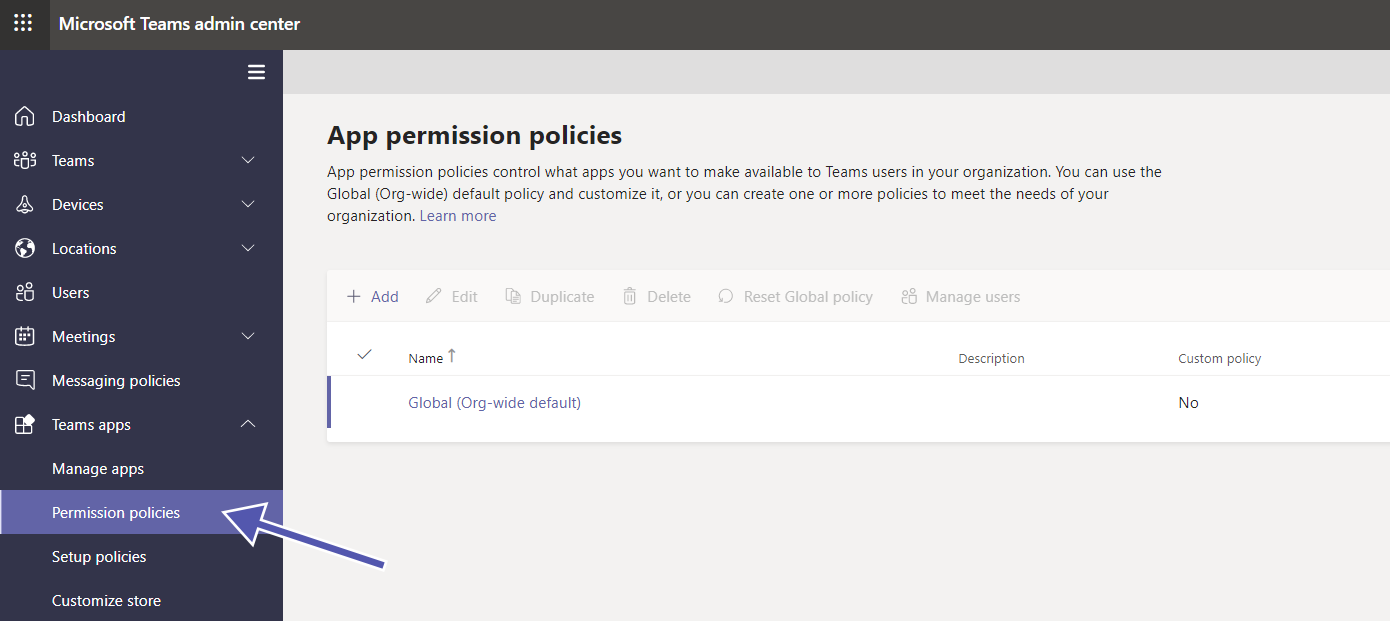
Using this setting, you can manage your organization’s Microsoft Teams apps in the Teams Admin Center. Admins can change security settings for apps, app setup policies, permission policies, etc. With these settings, admins can control the use of apps in their organization and create a better, more secure collaboration environment.
These are the available options:
- You can set a global org-wide policy to define what apps are available throughout the organization.
- You can create individual app permission policies to define what apps are available for specific teams or specific users.
- You can also pin the users’ critical apps to make it more convenient for them to find those.
Read this blogpost for more details on the setting options for Microsoft Teams app permission policies.
4. Org-wide settings for Microsoft Teams
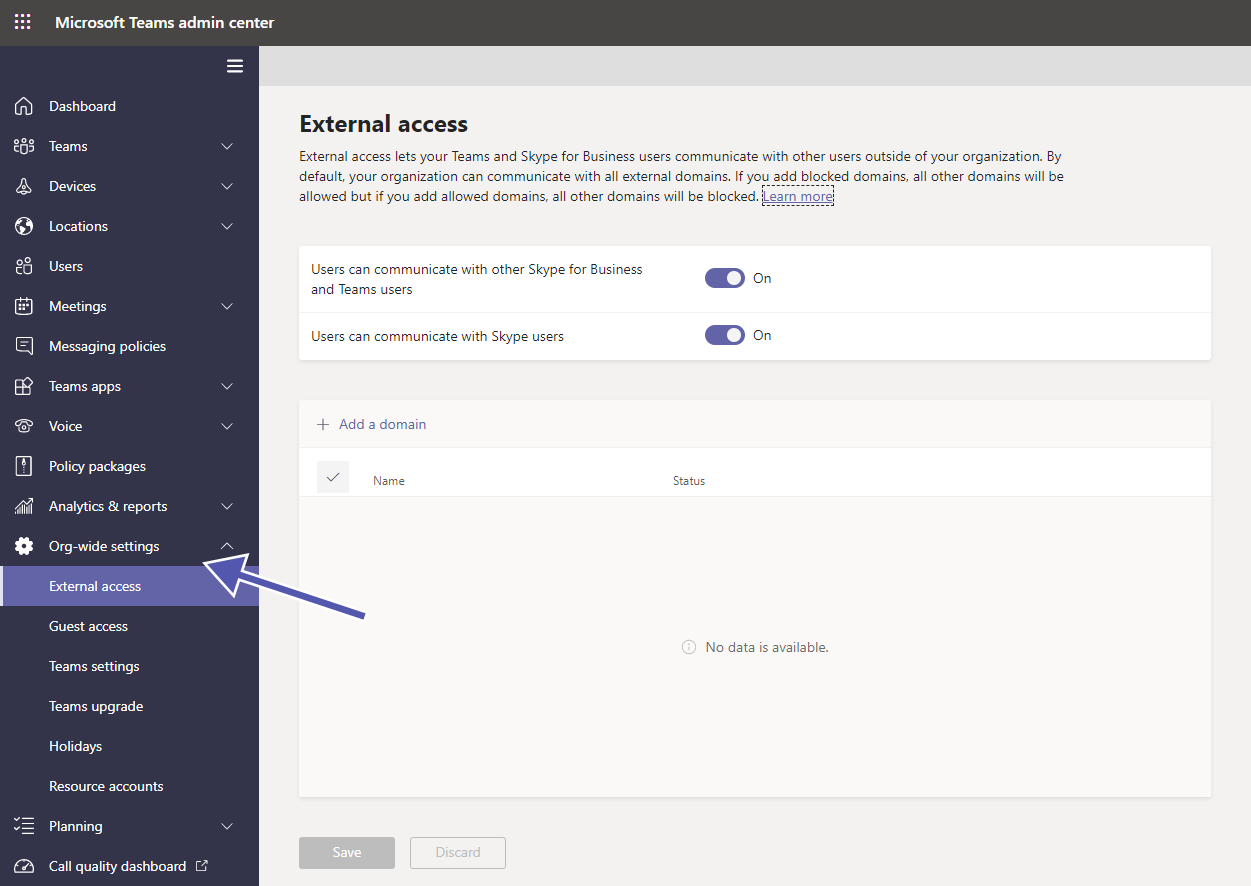
In the Teams Admin Center you can also find a variety of org-wide settings to control which users may access your environment and your data.
There are two kinds of settings for people from outside your organization: guest access and external access. You can find even more details in this blogpost on how to control your guest access settings.
Before we continue with how to configure these access settings, these are the differences between external access and guest access.
| External Access | Guest Access |
| With “external access”, users from outside your organization, i.e. with a different domain, can chat, call, and communicate with your users. These people will not have the same reach of your teams and other resources as users from your organization. In Microsoft Teams this feature is enabled by default. Two organizations can communicate until or unless the Microsoft Teams admins decide not to use external access. | You can add guest users as members to a team. These guests will have access to the channels in the team, the chat, use the call function, and work on files. Guest users have almost equal access just like a team member. It is critical to understand that the guest user even has access to your files in SharePoint, Office 365 and OneDrive. |
4.1 Implementation of Guest Access
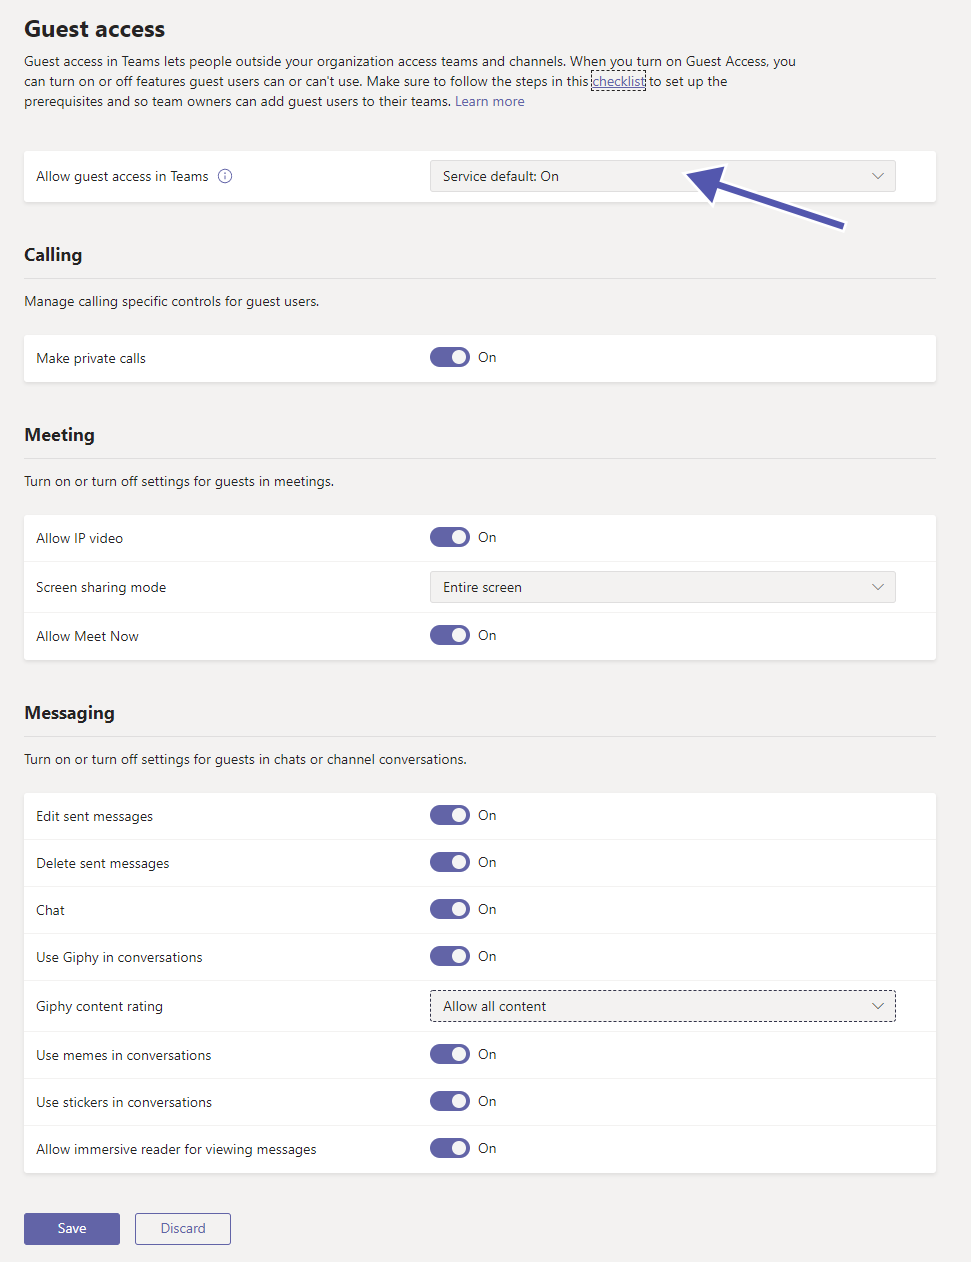
Guest users have almost the same level of access like team members. It is critical to understand how it is different from external access. Microsoft Teams has enabled the guest access feature by default since February 2021 for new companies as well as for companies who have not yet configured this feature.
Activate or deactivate the following options:
- Allow or deny guest access in Teams overall (the default is set to “on”)
- Make private calls
- Allow IP video
- Screen sharing mode
- Allow Meet Now
- Edit sent messages
- Delete sent messages
- Chat
- Use Giphy in conversations
- Giphy content rating
- Use memes in conversations
- Use stickers in conversations
- Allow immersive reader for viewing messages
Manage guest users in Microsoft Teams with External User Manager. Use approval workflow, access control, reporting and more.

4.2 Implementation of External Access

External access is enabled by default when Teams is deployed. However, administrators can of course decide to have it deactivated.
If you decide to enable external access, you have several options to control the level of access. For example, you can allow or block any domain. You can also define whether users should be able to communicate with other Teams, Skype for Business and Skype users.
The main reason for disabling external access is to only give access where it is really required. Of course this means more effort on part of the IT and admins, but the higher level of security more than makes up for it.
5. Designate roles for meetings in Microsoft Teams
Here we will discuss temporary designations you can give to the participants of a meeting. It gives a secure and reliable meeting experience. How you can designate participants and how to set up policies is explained below.
5.1 Roles in a Microsoft Teams Meeting
When you organize a meeting where multiple people will attend, you can assign different roles to the participants with different options to contribute to the meeting. The roles are classified into three groups: organizers, presenters, and attendees.
Organizers and presenters have access over all features, while attendees have a more limited role.
Organizers and presenters have control over sharing videos. They can communicate through chat or voice, remove any participant, admit users from the lobby, start and stop live transmission or recording, mute other users, get control over other participant’s presentations, etc.
The attendees’ role is limited to sharing a video, participating in the communication, and privately viewing a presentation file shared by someone else.
5.2 Changing meeting roles
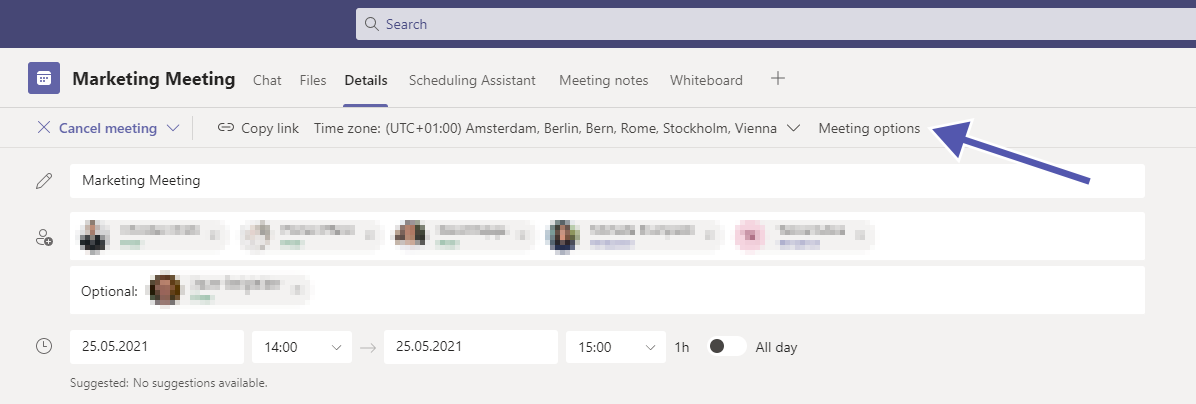
Before assigning the roles to the meeting participants, you need to send out the invitations to the meeting. After sending the invites, go to your calendar and select the meeting you have created. Then go to the Meeting Options, which will open a new page.
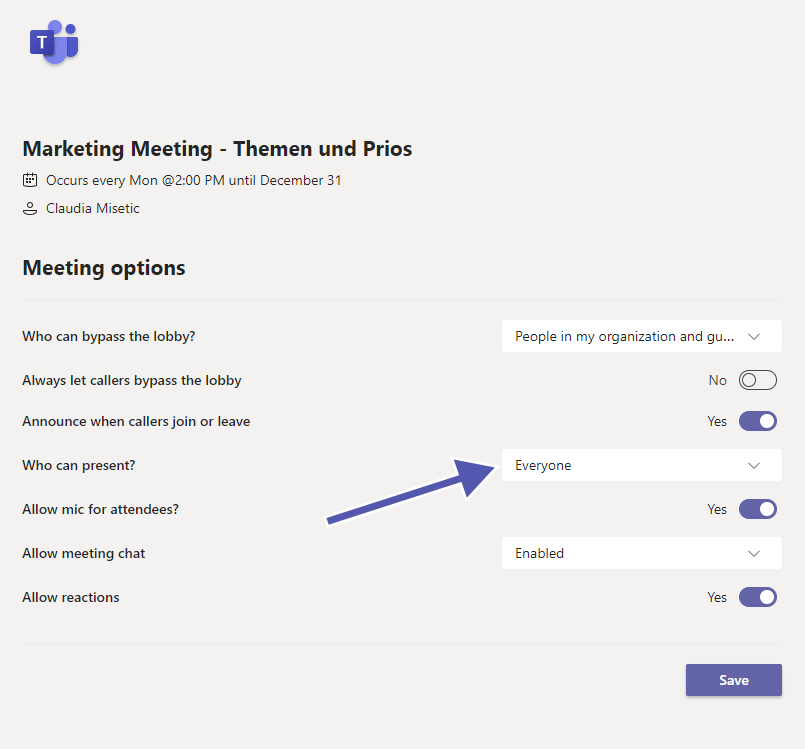
Here you can see several options under the dropdown menu “Who can present?” and are able to update the designated roles of the participants accordingly.
Please note: You need to send an invite directly to the people you want to choose as a presenter. Also, you can’t select a participant from a different organization as a presenter.
5.3 Changing roles during a meeting
There are also two ways to change participants’s roles when you are in the middle of a meeting:
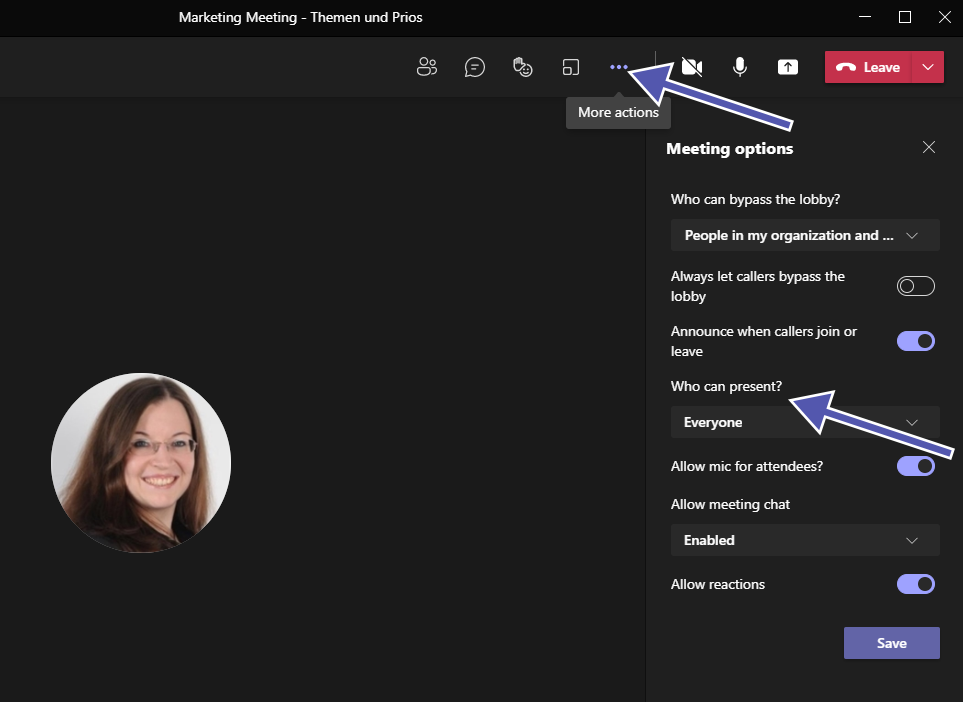
- Go to the calendar, select the meeting, then click on “meeting options”. Open the dropdown menu at “Who can present?” to add a new presenter. (see point 5.2 for details)
- Select “Show participants” in the meeting controls to get the list of all the meeting participants. Hover over the user’s name whose role you want to change, then select “More options.” Now you can select either “Make an attendee” or “Make a presenter.”
6. Cloud Recording
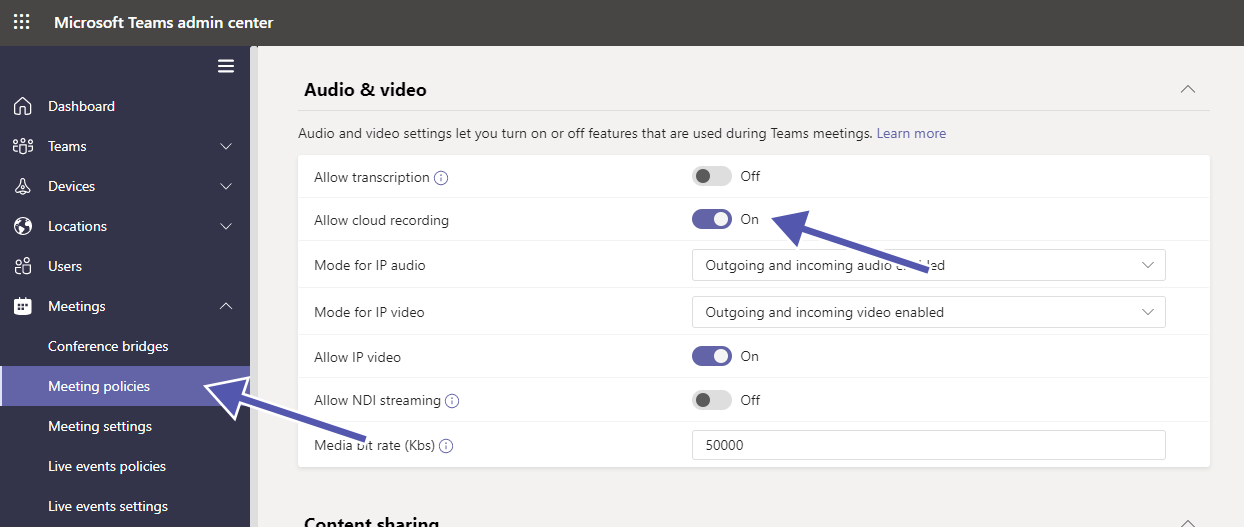
Recording meetings is an excellent feature that Microsoft Teams offers, but you should make sure to know where the data and videos are stored. Also it is critical to understand compliance and get the participants’ consent prior to recording the videos. Until 2021, the recordings were automatically stored in Microsoft Stream. From January to August 2021, the storage of cloud recordings will be moved to OneDrive and SharePoint.
7. Secure data with Information Barriers
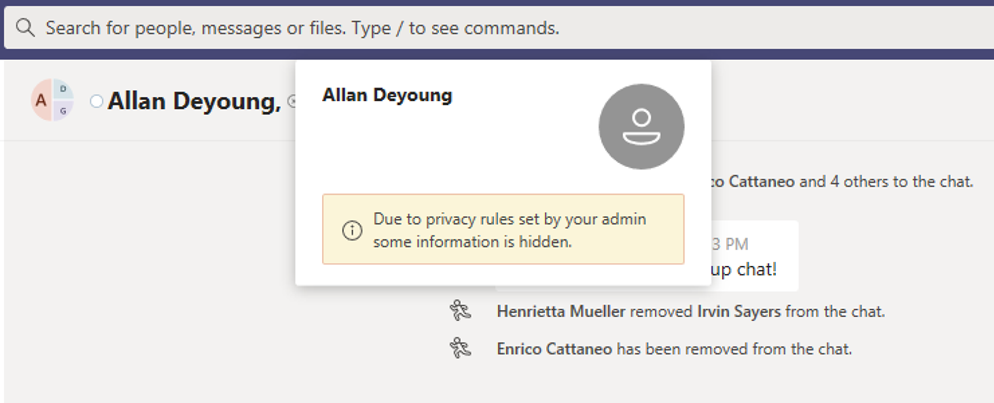

With Information Barrier policies you can prevent groups and individual users from communicating between each other. This is an important component for keeping data and information secure in your organization.
You can either restrict a team from communicating with one other, specific team, or restrict a team from communicating with any other team.
Usually, information barriers occur when any of the following take place.
- A new member is added to the team.
- A new participant is invited to join a meeting.
- A user makes a phone call (VOIP call) in Microsoft Teams.
- A user shares a screen.
- A user requests a new chat.
- Whenever there are guest users in Teams.
At Microsoft Ignite in March 2021, two additional new features were announced to be coming soon: Sharing channels with Microsoft Teams Connect, and settings for invite-only meetings. These two features will be rolled out during 2021 and will then need a closer look to see how they impact security in Microsoft Teams.
This covers the Microsoft Teams security settings related to aspects of Collaboration. For a look at configuring compliance settings for Microsoft Teams, see part 2 of our blog series, while part 3 covers settings specific to security in Microsoft Teams.
Do you want to strengthen your Microsoft Teams security? Have a look at our External User Manager for managing and controlling guest users, and at our Teams Manager for Microsoft Teams templates, lifecycles and naming conventions.


CEO and Governance Expert – Christian Groß is a Teams expert from the very beginning. In the last 4 years he developed 6 Teams Apps, built up his own service company and additionally founded the largest German-speaking Teams conference.


