Microsoft Teams Provisioning: A Guide to efficient and automated Processes
What is Teams provisioning and why is it important?
Teams provisioning is an important process for providing new teams in Microsoft Teams in a structured and controlled manner. The default setting of Microsoft Teams allows all users to create unlimited teams (see Governance in Microsoft Teams). Without clear policies and automation, this can quickly lead to a confusing Teams environment with superfluous or unused Teams. This uncontrolled growth makes navigation difficult, reduces productivity and threatens your Microsoft 365 security.
With Teams provisioning, you can avoid these problems by working with an approval workflow and preconfigured Microsoft Teams templates when creating teams. At the same time, your employees can use Teams efficiently without being limited by too many restrictions.
Read more on the topic here: Pfleiderer introduces an automated ticket system for requesting new teams.
In this article you will learn:
- How to create teams in the classic way in Microsoft Teams.
- How to provision teams with API calls and PowerShell.
- Why automating Teams provisioning is essential and what challenges it solves
- How Teams Manager helps you with automated Teams provisioning and how your Teams environment benefits from it.

Classic Teams Creation in the Microsoft Teams Interface
The easiest and most direct way to create a team is via the Microsoft Teams user interface.
How to create Teams in Microsoft Teams
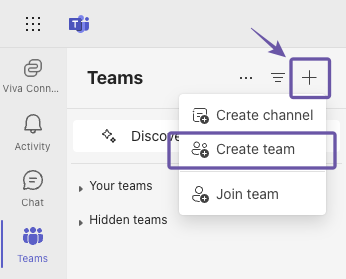
- Open Microsoft Teams and click on “Teams” in the left menu bar.
- Click on the “+” and then on “Create team”
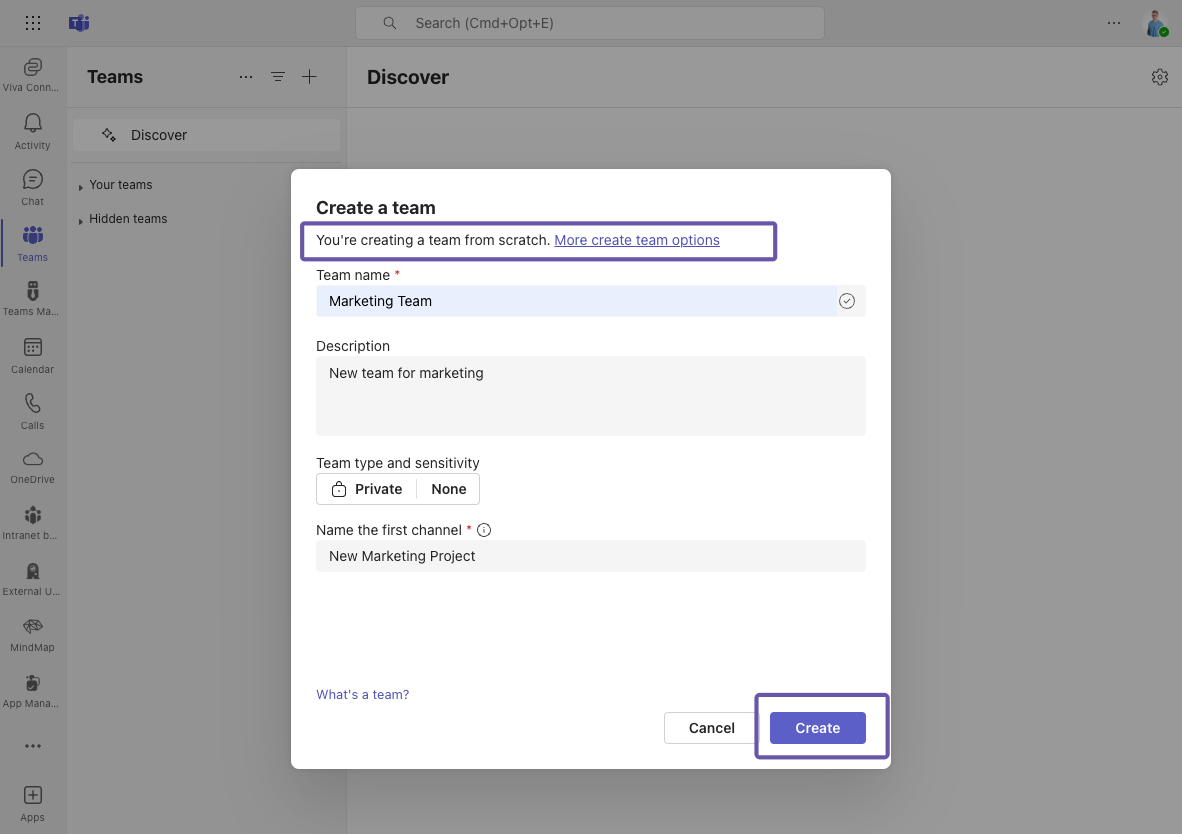
- By default, you will now create a completely new team. If you want to use a template, click on “More create team options”.
- Give the team a name, add a description and set the options for the team type and sensitivity.
- Once your team is created, click on the three dots “…” next to your team, select “Manage team” and add members and configure permissions.
Limitations and Problems of Classic Teams Creation
- No possibility to implement templates or governance policies such as naming conventions or lifecycles.
- Manually adding members, channels and apps takes time and could lead to errors
- No automation possible, which leads to huge administrative workload for large organizations
Teams Provisioning with API Calls
For tech-versed users, Microsoft Graph API offers a way to create and configure teams via programmatic interfaces.
Step-by-Step Guide to Provisioning with API Calls
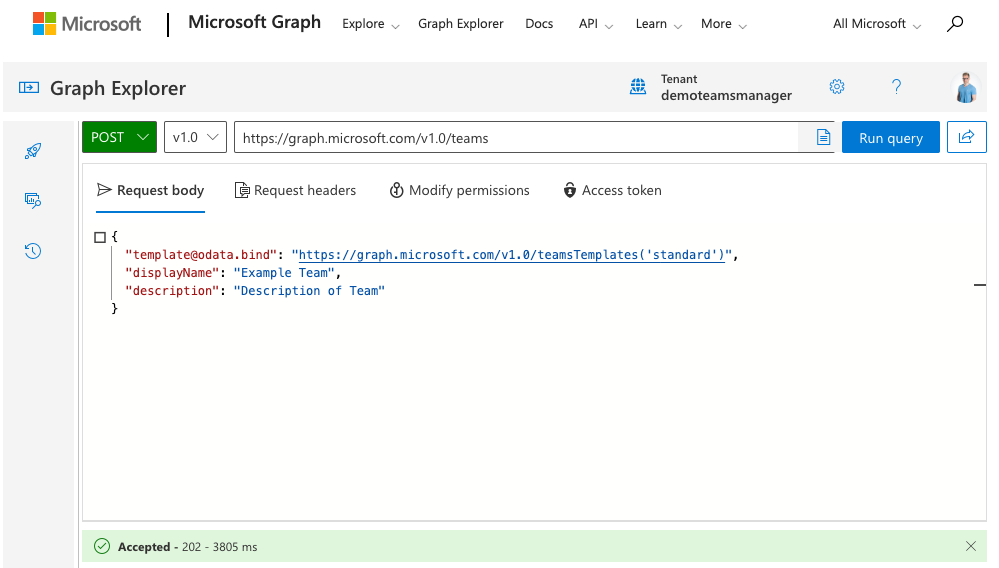
Note: To test Teams provisioning with API calls, you can start directly with step 3 and execute the commands in Microsoft Graph Explorer.
1. Authorization:
Request a token from Microsoft Graph API to obtain authorizations. Consider in advance whether you want to use “Access on behalf of the user” (login with username and password) or “Access without the user” (automated process, without login with user).
See here: https://learn.microsoft.com/en-us/graph/auth/auth-concepts
2. If you want to automate Teams provisioning, further steps with Azure Function or Flow are necessary at this point. To simplify things, we will show you how to execute commands using Graph Explorer as an example:
3. Create team and assign permissions:
POST https://graph.microsoft.com/v1.0/teams
Content-Type: application/json
Authorization: Bearer {token}
Body:
{
  "[email protected]": "https://graph.microsoft.com/v1.0/teamsTemplates('standard')",
  "displayName": "Example Team",
  "description": "Description of Team"
}
Depending on which permissions you want to assign, you can also include the following attributes in the body:
{
  "allowCreatePrivateChannels": true,
  "allowCreateUpdateChannels": true,
  "allowDeleteChannels": true,
  "allowAddRemoveApps": true,
  "allowCreateUpdateRemoveTabs": true,
  "allowCreateUpdateRemoveConnectors": true
}
4. Add channels:
POST https://graph.microsoft.com/v1.0/teams/{team-id}/channels
Body:
{
  "displayName": "Project management",
  "isFavoriteByDefault": true
}
5. Add members:
POST https://graph.microsoft.com/v1.0/teams/{team-id}/members
Body:
{
  "@odata.type": "#microsoft.graph.aadUserConversationMember",
  "[email protected]": "https://graph.microsoft.com/v1.0/users('{user-id}')"
}
6. Archive team:
POST https://graph.microsoft.com/v1.0/teams/{team-id}/archive7. Delete team:
DELETE https://graph.microsoft.com/v1.0/groups/{team-id}Automation Steps and Challenges in Provisioning with API Calls
- API alone is not enough, you need an action that triggers the automation (e.g. Flow).
- Complex configuration that requires in-depth API knowledge and knowledge of the system to be integrated.
- High workload for repeated changes.
- Maintenance work must be considered.
Teams Provisioning with PowerShell
PowerShell offers another option for Teams provisioning and is particularly popular among administrators.
Step-by-Step Instructions for Provisioning Teams with PowerShell
1. Open PowerShell and authenticate yourself:
Connect-MicrosoftTeams2. Create team:
New-Team -DisplayName "Example Team" -Description "Description"3. Add channels:
New-TeamChannel -GroupId {GroupId} -DisplayName "Project management"4. Add members:
Add-TeamUser -GroupId {GroupId} -User "{User-ID}"5. Set permissions:
Depending on which permissions you want to assign, you can use these commands:
Set-Team -GroupId <GroupId> -AllowCreatePrivateChannels $true
Set-Team -GroupId <GroupId> -AllowCreateUpdateChannels $true
Set-Team -GroupId <GroupId> -AllowDeleteChannels $true
Set-Team -GroupId <GroupId> -AllowUserAddRemoveApps $true
Set-Team -GroupId <GroupId> -AllowCreateUpdateRemoveTabs $true
Set-Team -GroupId <GroupId> -AllowCreateUpdateRemoveConnectors $true
6. Archive team:
Set-TeamArchivedState -GroupId {GroupId} -Archived $true7. Delete team:
Remove-Team -GroupId {GroupId}Automation Steps and Challenges when Provisioning with PowerShell
- PowerShell script may need to be converted to Azure Function for full automation.
- Scripts must be created and maintained manually.
- No standardized interface for users.
- Errors in script changes can affect the entire automation.
- Often lack of documentation, which means scripts often have to be rebuilt when changing admin.
Why should you automate Teams Provisioning?
In Teams provisioning, there are many recurring tasks that are necessary for the creation and administration of teams. These include setting up templates, defining naming conventions, obtaining approvals, adding members and channels, implementing lifecycles and archiving or deleting inactive teams. Without automation, these tasks have to be executed individually for each team.
By automating these processes, the manual effort is significantly reduced and the Teams environment remains efficient and compliant.
Advantages of Automation
- Time savings: By eliminating manual processes, administrators and employees save valuable time.
- Consistency: All teams comply with standardized templates and governance policies such as naming conventions, metadata and lifecycles.
- Improved overview: The Teams environment remains tidy and clearly structured, allowing employees to find the right team more quickly.
- Fewer errors: Automated workflows reduce the risk of errors that often occur with manual processes.
- Increased security: Policies such as guest access and sensitivity labels are automatically applied, ensuring compliance requirements are met.
Challenges of Automation with PowerShell and API Calls
- Complexity: Scripts, APIs, Azure Function and Flow require technical expertise and detailed configurations.
- Maintenance effort: Changes in the environment or requirements lead to repeated adjustments to the scripts.
- Lack of user-friendliness: End users cannot use these solutions without administrator support.
- Limited flexibility: Automation solutions are often static and cannot be quickly adapted or extended without in-depth knowledge of scripting and API integration, significantly limiting agility as requirements change.
- Lack of governance integration: PowerShell and API solutions do not provide native support for governance policies such as naming conventions, lifecycles or approval processes. These need to be implemented separately and continuously monitored.
A third-party tool such as Teams Manager provides a remedy here by bundling and optimizing these processes in a simple user interface. With functions such as templates, approval workflows and lifecycle management, Teams Manager reduces the effort to a minimum and ensures seamless integration into the existing environment.

Automated Teams Provisioning with Teams Manager
Teams Manager is an app developed specifically for Microsoft Teams Governance and Teams provisioning. It can be used to automate all the processes required to create and manage teams while seamlessly integrating governance policies.
How does Teams Provisioning work with Teams Manager?
Teams Manager offers the following functions for Teams provisioning, among others:
- Approval workflows: Before a new team is created, the request goes through a review. This ensures that only necessary and compliant teams are created.
- Templates: You can define channels, apps, permissions and other elements in advance to ensure a uniform structure for all teams.
- Lifecycle management: Teams Manager identifies inactive teams and archives or deletes them based on defined rules.
Creating a team with Teams Manager:
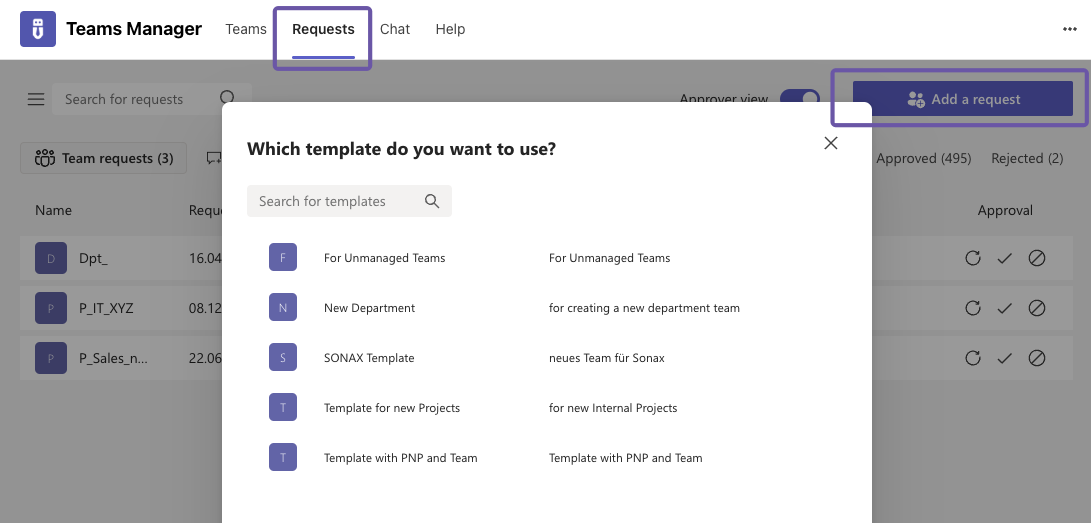
- Team request: Users submit a request using a simple form. Here they can select a template and enter information such as team name, description and members.
- Approval: An administrator checks the request and can then approve or reject it.
- Team creation: After approval, Teams Manager automatically creates the team and applies all predefined settings and policies.
See our blog post on Teams Manager Basics for more detailed instructions on Teams provisioning with Teams Manager.
Advantages of Teams Provisioning with Teams Manager
- Easy to use: Intuitive user interface that requires no prior technical knowledge.
- Central platform: All processes, from approval workflow to template synchronization, are directly integrated into Microsoft Teams.
- Automatic application of policies: Naming conventions, lifecycles and governance policies are automatically applied to new teams.
- Low maintenance: Changes and updates can be implemented without manually adapting scripts or code.
- Time-saving: Teams Manager takes care of provisioning completely automatically, no manual intervention is required. This saves administrators time and gives end users faster access to ready-to-use teams.
FAQ about Teams Provisioning
Teams provisioning is the process by which new teams are provided in Microsoft Teams according to fixed specifications. This includes naming conventions, permissions and structure to create a uniform and clear environment.
Teams can be created manually via the Microsoft Teams interface, technically via API calls or PowerShell, or automatically using tools such as the Teams Manager. Each method has advantages and disadvantages, with automation being the most efficient.
Automating Teams provisioning saves time, reduces errors and ensures that all teams are created consistently and in accordance with the rules. It also ensures a clear environment and reduces the workload of administrators.
The Teams Manager offers an easy way to automate Teams provisioning. Features such as templates, approval workflows and lifecycle management make it particularly useful.
With lifecycle management, inactive teams are identified and archived or deleted based on rules. Teams Manager takes care of this process automatically, so you can always keep your Teams environment organized.
Approval workflows check team requests before a team is created. This ensures that only relevant and compliant teams are created. Teams Manager integrates these workflows directly into Microsoft Teams for easy and efficient management.
Yes, with Teams Manager, existing teams can be integrated into a governance concept. Policies such as naming conventions or lifecycles can be applied retrospectively.
Templates allow you to define channels, apps, permissions and more for new teams in advance. This saves time and ensures a uniform structure.
Teams Manager automates the creation of teams and integrates guidelines such as templates, workflows and lifecycles. This makes Teams provisioning efficient and user-friendly.
Automation avoids uncontrolled growth, saves time and ensures a clearly structured Teams environment. Manual processes are error-prone and time-consuming, while automated workflows solve these problems.
Automated Teams provisioning with Teams Manager not only saves time, but also ensures a uniform and clear Teams environment.
See Teams provisioning with Teams Manager live now!

Head of Marketing & Sales at Solutions2Share – Florian Pflanz has 6 years of M365 experience and has been involved in numerous projects concerning Microsoft Teams governance. In over 200 workshops, he has collected extensive knowledge and best practices regarding Microsoft Teams and companies’ management requirements.


