How to Implement Viva Connections
Viva Connections is a Microsoft service designed to improve internal communication and collaboration in your company. It provides easy access to your digital workplace and keeps everyone informed. With implementing Viva Connections, you can integrate your company’s intranet directly into Microsoft Teams, making it easily accessible for all employees.
By following the steps below, you can successfully implement and launch Viva Connections in Microsoft Teams.
Why should I Implement Viva Connections?
Here are some key benefits of implementing Viva Connections:
- Centralized communication: Keep everyone informed with the latest company updates, events, and important documents.
- Seamless integration with Microsoft Teams: Your SharePoint intranet is directly integrated into Teams, simplifying collaboration and communication.
- Customizable dashboard: Personalize dashboards with relevant information for different groups within your organization.
- Mobile access: Employees can access the intranet from anywhere using the Teams mobile app.
An alternative to Viva Connections is the app Intranet by Solutions2Share. It is an easy-to-install app, fully configurable and editable in Microsoft Teams and offers additional web parts and design options.
What are the Requirements for the Implementation of Viva Connections?
Before you start implementing Viva Connections, please note the following:
- Licensing: You need an Enterprise (E), Frontline (F), or Academic (A) license to create a Viva Connections experience. If you want to create more than one experience (up to 50), every user must have a Microsoft Viva Suite or Viva Communications and Communities license.
- Admin permissions: You must have SharePoint admin permissions to access the Microsoft 365 Admin Center and Teams admin permissions to pin the Viva Connections app in Teams.
- Multi-Geo tenants: If your SharePoint home site is part of a multi-geo tenant, you will need to manage permissions in the SharePoint Admin Center.
Step-by-Step Guide – How to Implement Viva Connections
This guide provides step-by-step instructions to help you set up Viva Connections for your organization in the Microsoft 365 Admin Center and integrate it into Microsoft Teams.
Step 1: Access Viva Connections in the Microsoft Admin Center
- Open the Microsoft 365 admin center and sign in with your admin credentials.
- Got to Settings. If you do not see it, click Show all to expand the menu.
- Under Settings, select Viva.
- Click Viva Connections to open the Viva Connections admin center.
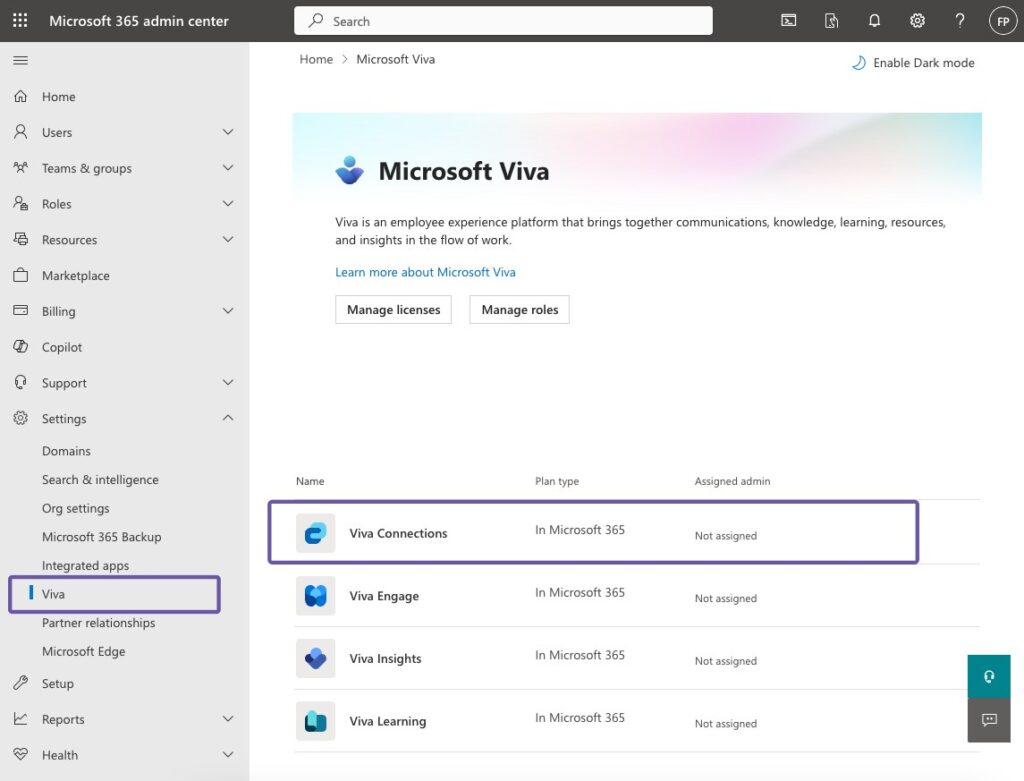
If you already have a SharePoint home site (your intranet), it will automatically appear as a Viva Connections experience.
Step 2: Create a New Viva Connections Experience
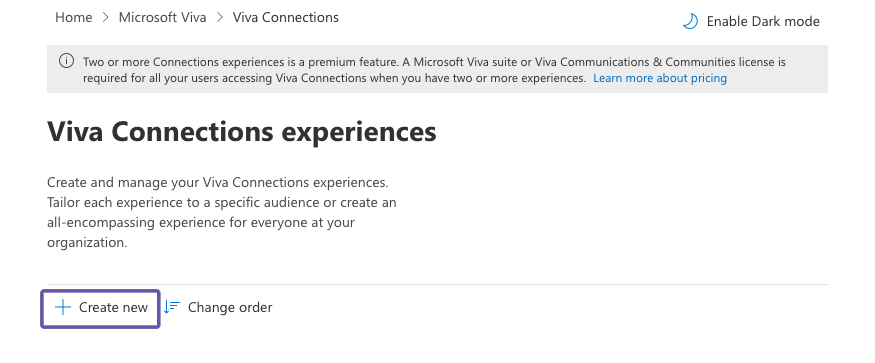
To create a new Viva Connection experience, click on Create and manage Viva Connections experiences.
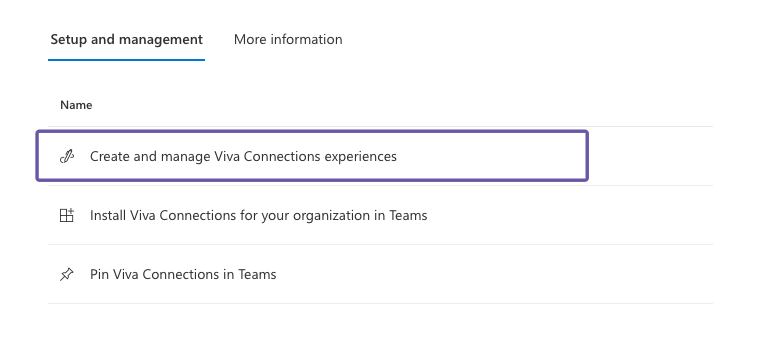
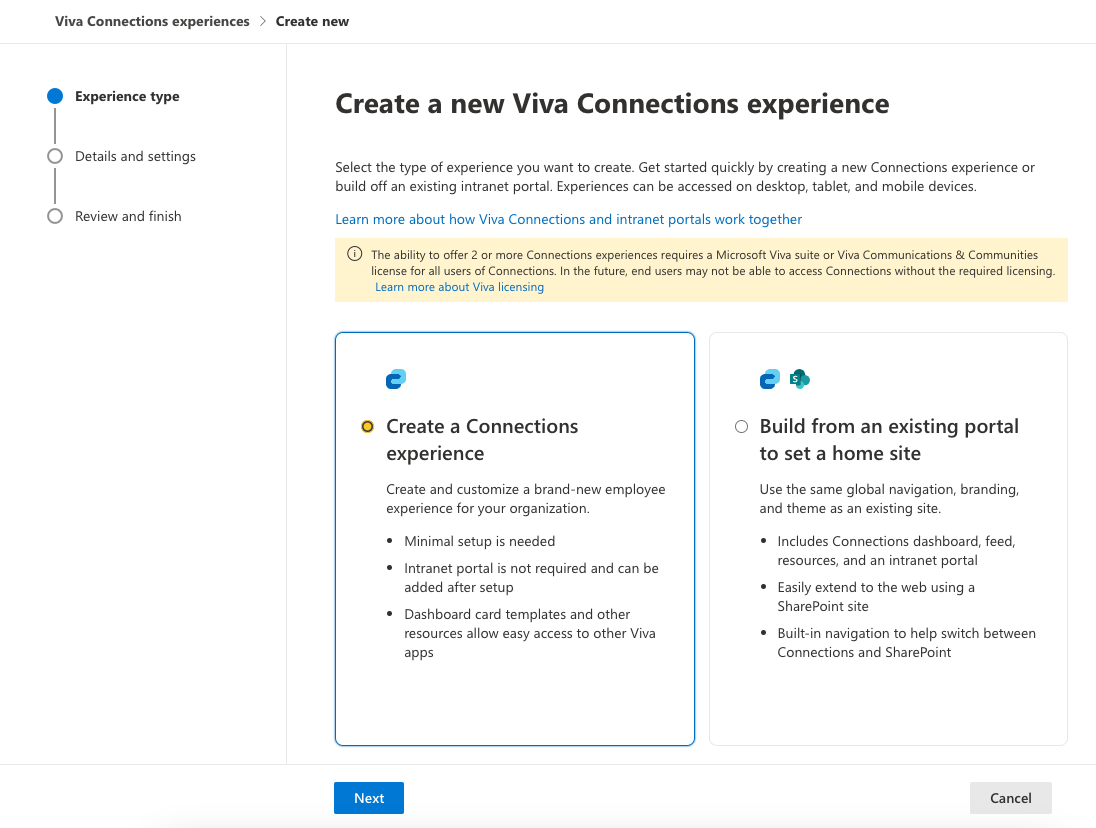
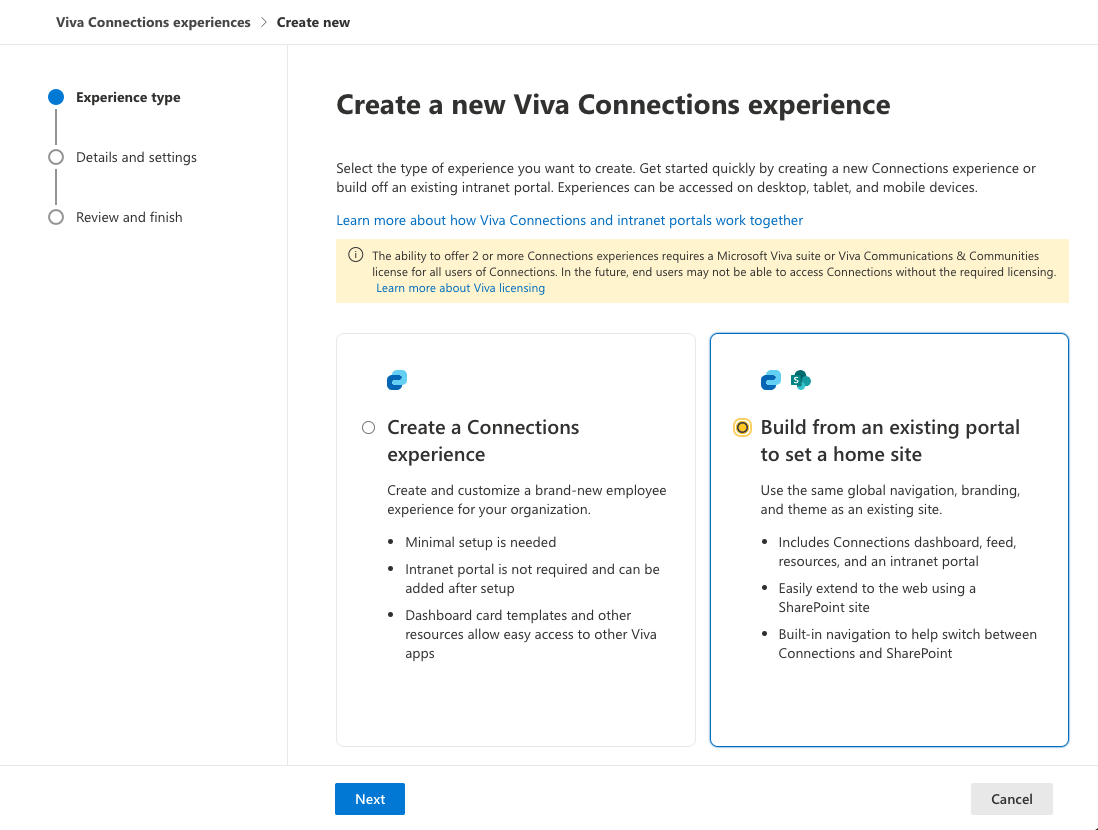
You have two options for creating a Viva Connections experience:
- Create a standalone Viva Connections experience.
- Build from an existing intranet (SharePoint) portal.
Option 1: Create a Standalone Viva Connections Experience
- In the Viva Connections admin center, click + Create new.
- Select Create a Connections experience and click Next.
- Enter a name and a description for your experience, define the settings and click Next.
- Review the settings and click Create experience.
Note: A special site container will be created to host the Viva Connections dashboard and resources. You can add content later, and designate a SharePoint intranet as a home site at any time.
Option 2: Build from an Existing Intranet Portal
- In the Viva Connections admin center, click + Create new.
- Select Build from an existing intranet portal and click Next.
- Paste the URL of your SharePoint communication site.
- Review your settings and click Create experience.
Note: The SharePoint communication site will be automatically set as the home site.
Looking for an easier way to implement your intranet in Teams?
Check out Intranet by Solutions2Share
Step 3: Assign Permissions
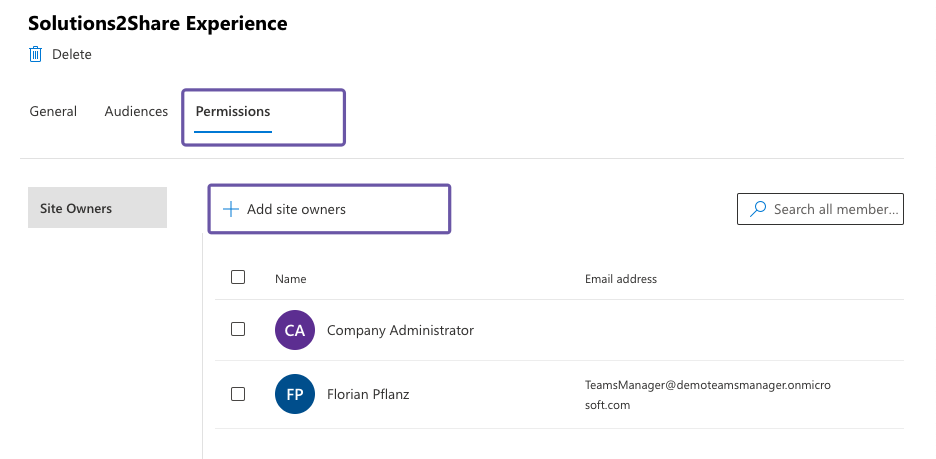
- In the Viva Connections admin center, select the experience you want to manage.
- Go to the Permissions tab.
- Click + Add site owners.
- Enter the names of the people you want to add as owners in the search bar.
- Once all owners have been selected, click Add.
Note: It’s recommended to have at least two owners for each Viva Connections experience. Owners have the ability to edit the experience and manage permissions and access of others.
Step 4: Set Target Audiences
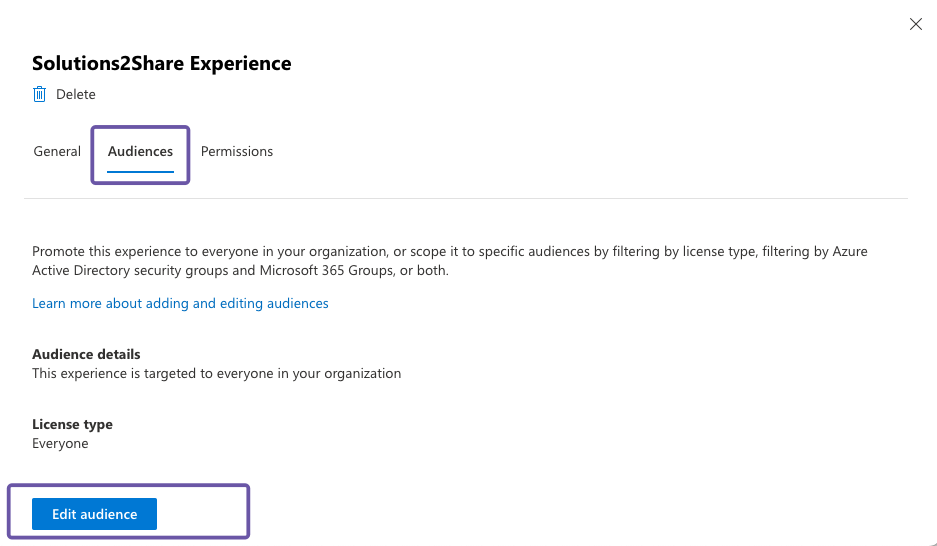
- Stay in the Experience settings panel and go to the Audiences tab.
- Click Edit audience.
- To target the entire organization, select Everyone in the organization.
- To target a specific audience, select Scope down the audience for this experience. Then, you can filter your audiences.
- Filter by group: Filter based on the Microsoft Entra group or M365 group.
- Filter by license type: Filter based on the subscriber license type.
- Click Save.
Note: Audience targeting doesn’t grant permissions to the experience, but it determines which users will see it by default. Visitors include everyone in your organization except external users.
Step 5: Set Experience Order
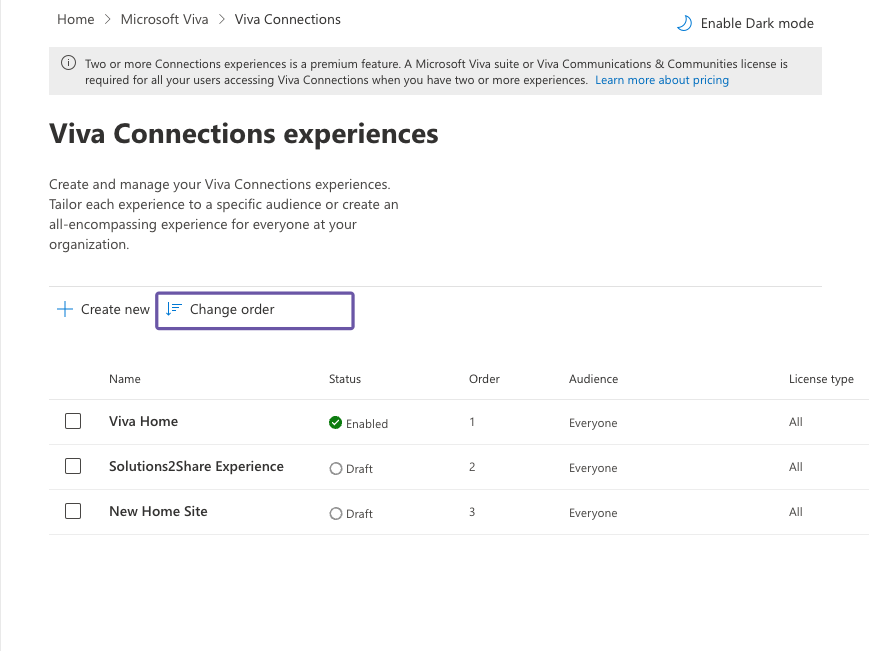
In case your organization has multiple Viva Connections experiences, you can define the order in which they will appear for users who belong to more than one audience.
- In the Viva Connections admin center, click Change order.
- Drag and drop the experiences to rearrange them as desired.
- Click Save to confirm.
Note: We recommend prioritizing experiences for smaller, specific audiences before more general experiences.
Step 6: Enable the Viva Connections Experience
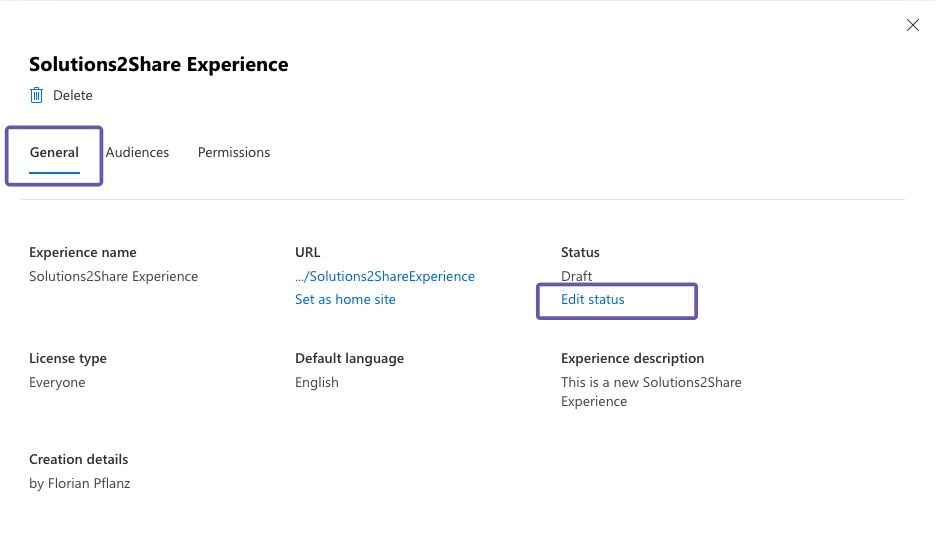
- In the Viva Connections admin center, select the experience you want to enable.
- Go to the General tab.
- Under Status, click Edit status.
- Select Enable experience.
- Click Save.
Note: Once the experience is enabled, it will be accessible to the users based on the audience targeting you have set.
Easy multilingual Teams intranet integration
Find out more about Intranet by Solutions2Share
Step 7: Pin the Viva Connections App in Teams
To ensure your employees can easily find Viva Connections, you should pin the app in Teams.
- Open the Teams Admin Center and sign in with your admin credentials.
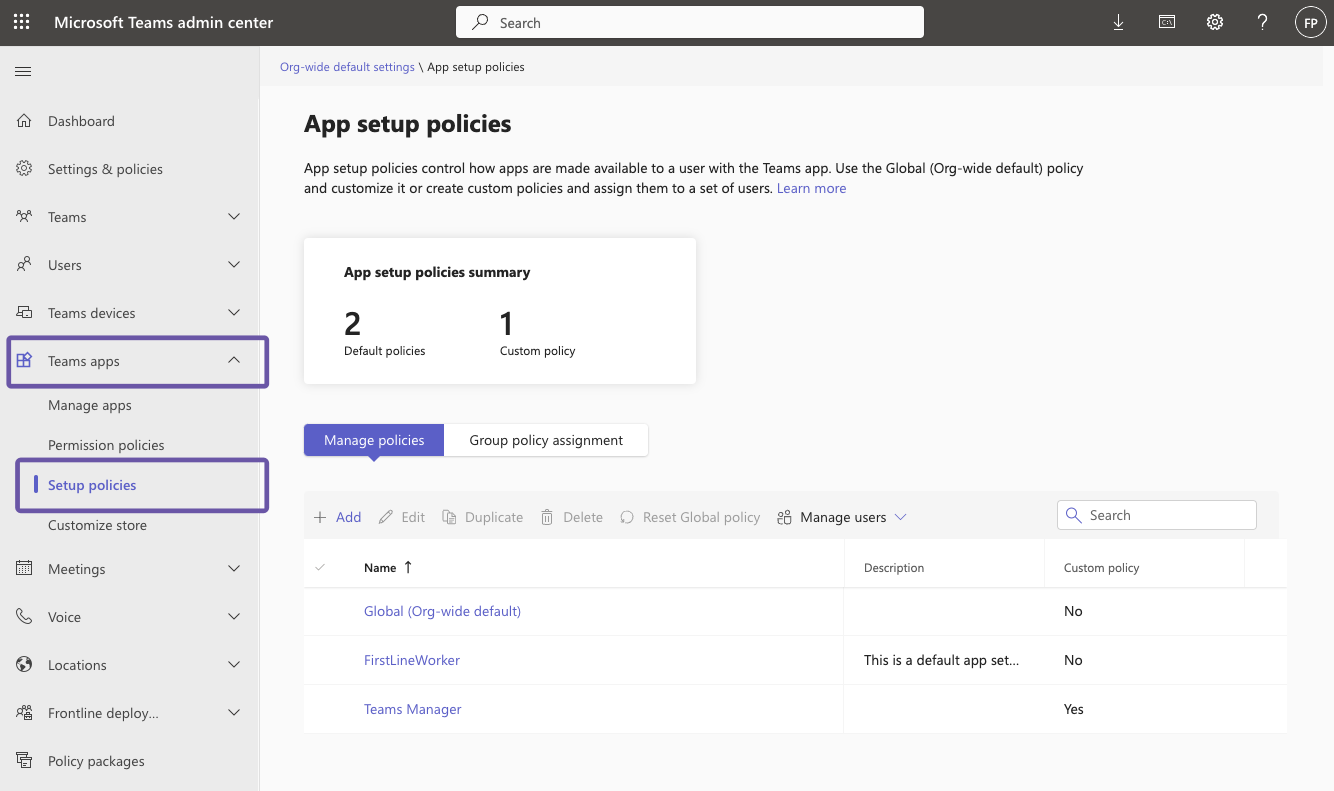
- Go to the menu and select Teams apps > Setup policies.
- Click Global (Org-wide default) or any other policy you want to modify.
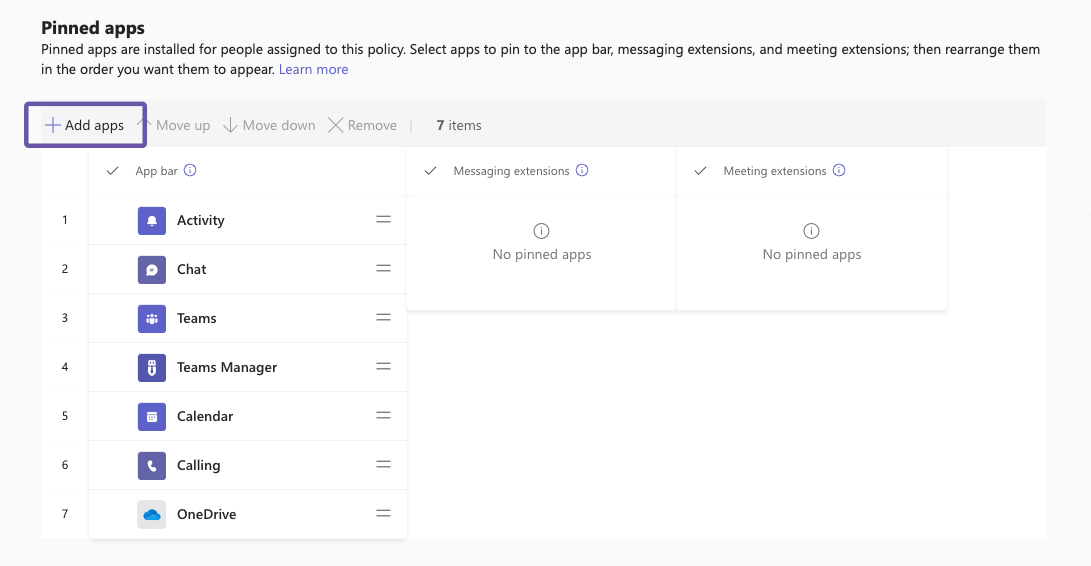
- Scroll down to Pinned apps.
- Click + Add apps.
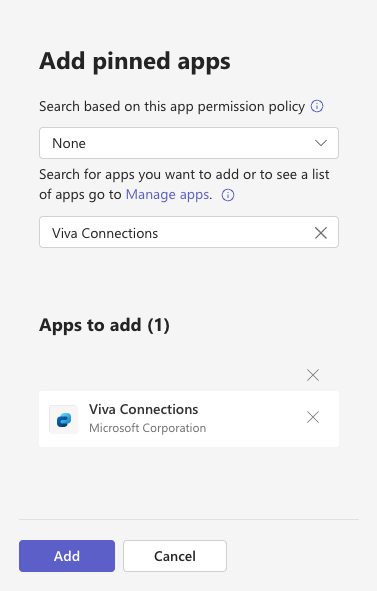
- Type “Viva Connections” in the search bar and select the app.
- Click on Add.
- Drag the app to the desired position in the pinned apps list (ideally at the top).
- Click Save to confirm the changes.
Note: If you have multiple experiences, ensure that the appropriate Viva Connections experience is pinned for each user group.
Step 8: Set App Icon and Name
To update the Viva Connections app icon and name for your organization in Teams, follow these steps:
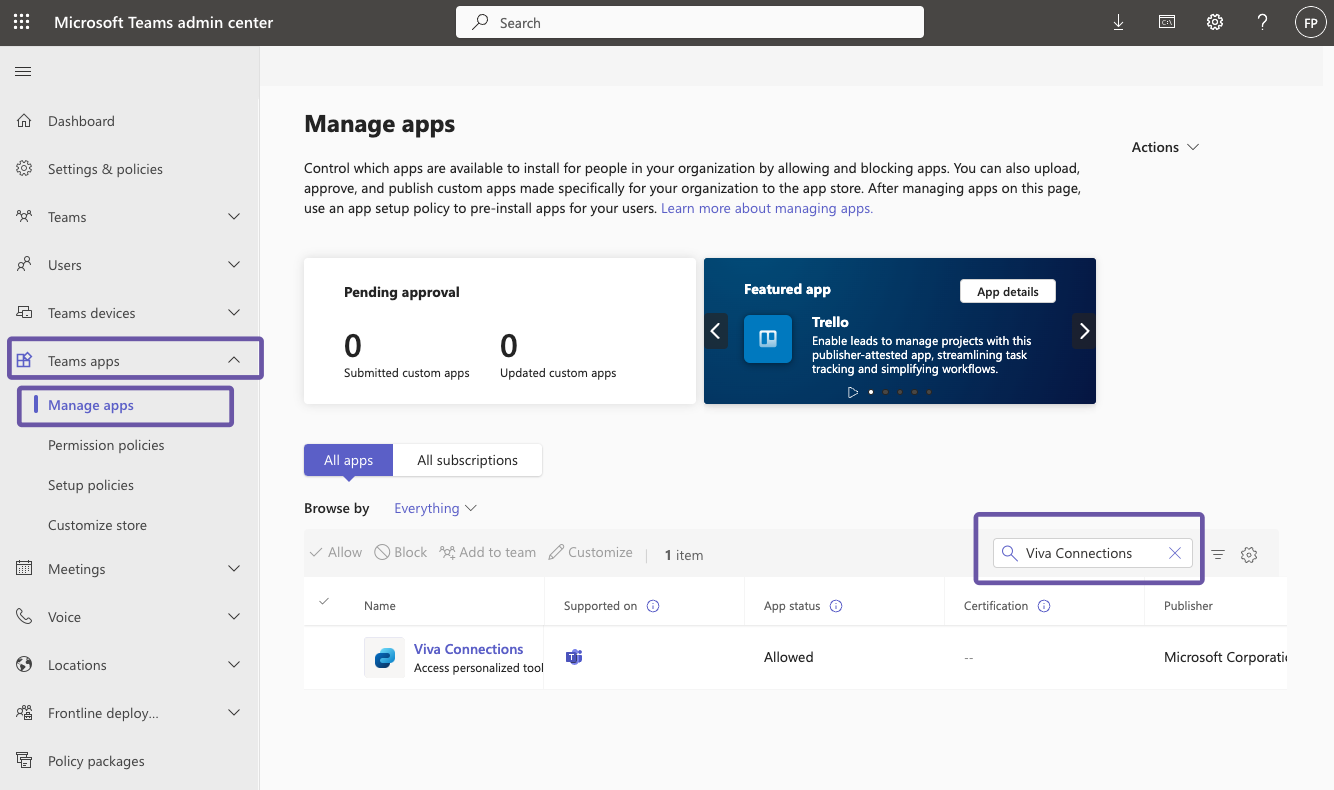
- In the Teams Admin Center, select Teams apps > Manage apps.
- In the search bar, type “Viva Connections” and select the app from the results.
- Click the pencil icon.
- Update the App name and App icon according to your branding preferences.
- Click Apply to confirm and save the updates.
Note: The app name and icon are managed at tenant level, meaning the same name and icon will apply to all Viva Connections experiences in Teams.
Step 9: Set a Standalone Experience as a Home Site
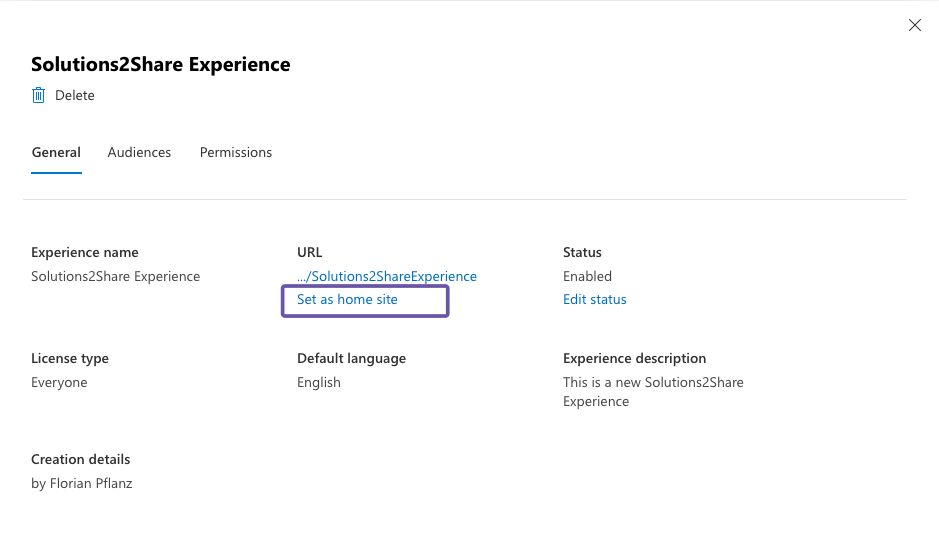
If you’ve created a standalone experience, you can set the site that holds your content as home site. This way, you get all the home site features while keeping the Viva Connections set up you’ve already created.
- Select the experience in the Viva Connection admin center you want to set as home site.
- In the General tab, locate the URL section.
- Click Set as home site.
- Confirm the action by clicking Set home site.
Congratulations! If you have followed all these steps, you have now successfully implemented Viva Connections. Now make sure that the desired audience can easily reach the home site and engage them to use it.
FAQ: How to Implement Viva Connections in Microsoft Teams
Viva Connections is an app in Microsoft Teams that centralizes communication, resources, and tools. The implementation of Viva Connections improves internal communication, collaboration and access to important information.
To implement Viva Connections, you need an Enterprise (E), Frontline (F), or Academic (A) license, SharePoint admin permissions, and Teams admin permissions. If you plan to create multiple experiences, a Microsoft Viva Suite or Viva Communications and Communities license for every user is required.
To implement Viva Connections, navigate to the Microsoft 365 Admin Center, sign in, and go to Settings > Viva > Viva Connections. This will open the Viva Connections admin center to start the setup.
You can create a standalone Viva Connections experience or build from an existing SharePoint intranet portal. After creating the experience, assign permissions and configure target audiences.
To update the app name and icon, go to the Teams Admin Center. Under Teams apps > Manage apps, search for Viva Connections, click the pencil icon and customize the name and icon. Confirm by clicking Apply.
To pin the Viva Connections app, go to the Teams Admin Center. Under Teams apps > Setup policies add Viva Connections to pinned apps and adjust its position in the app bar for easy access.
In the Viva Connections admin center, select your experience. In the General tab, go to the URL section and click Set as home site.
What is the Alternative to Implementing Viva Connections?
Viva Connections is a good way to integrate your intranet into Microsoft Teams. However, “Intranet by Solutions2Share” offers an even more comprehensive solution. Here are some differences:
- Quick installation: The intranet can be set up in just a few minutes.
- Full editable in Teams: You can set up and edit everything directly in Teams, without the need for extra tools.
- Additional features: Intranet by Solutions2Share includes additional web parts and more design options.
Book a demo and discover how easy you can integrate your Intranet in Teams.
Implement your intranet in Microsoft Teams in just a few minutes

Head of Marketing & Sales at Solutions2Share – Florian Pflanz has 6 years of M365 experience and has been involved in numerous projects concerning Microsoft Teams governance. In over 200 workshops, he has collected extensive knowledge and best practices regarding Microsoft Teams and companies’ management requirements.
